Manage Notification Preferences
Introduction
Setting Email and Portal Notification Preferences
Step 3:- You will then be re-directed to the Manage Notifications page. All the checkboxes on the page will be default selected which means all email and portal notifications will be On by default. You can remove the checkbox selection of those activities for which you do not want to receive the email or postal notification and then click on the save button.
Delegating the Email and Portal Notifications by Business Admins

- For a few activities, only Business Admins receive the notifications (for example- Connect Activities). With this new feature business admins can delegate the email and portal notifications to any other staff so that the selected staff can receive the emails and portal notifications on behalf of the business admin.
- Refer to the below steps to delegate the notifications.
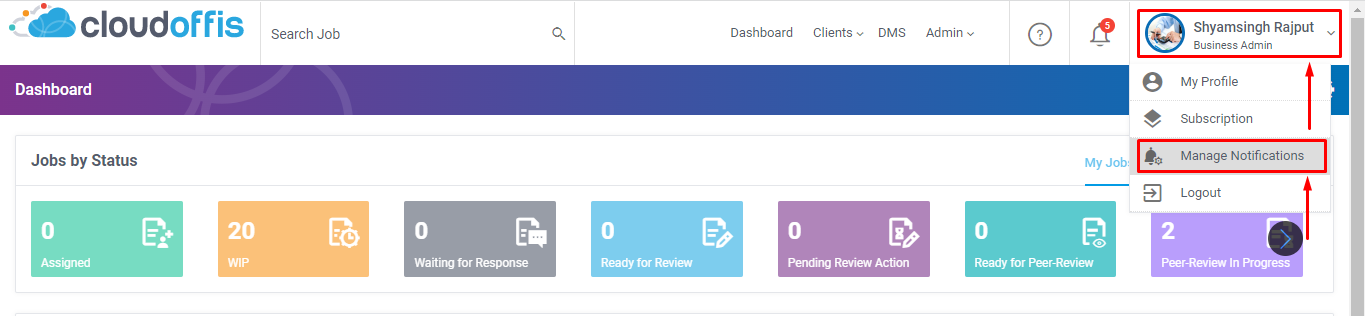
Step 1:- Once you log in to the platform, click on your Profile from the top right corner of the screen.
Step 2:- We have added a new page with the name Manage Notifications, click on it.
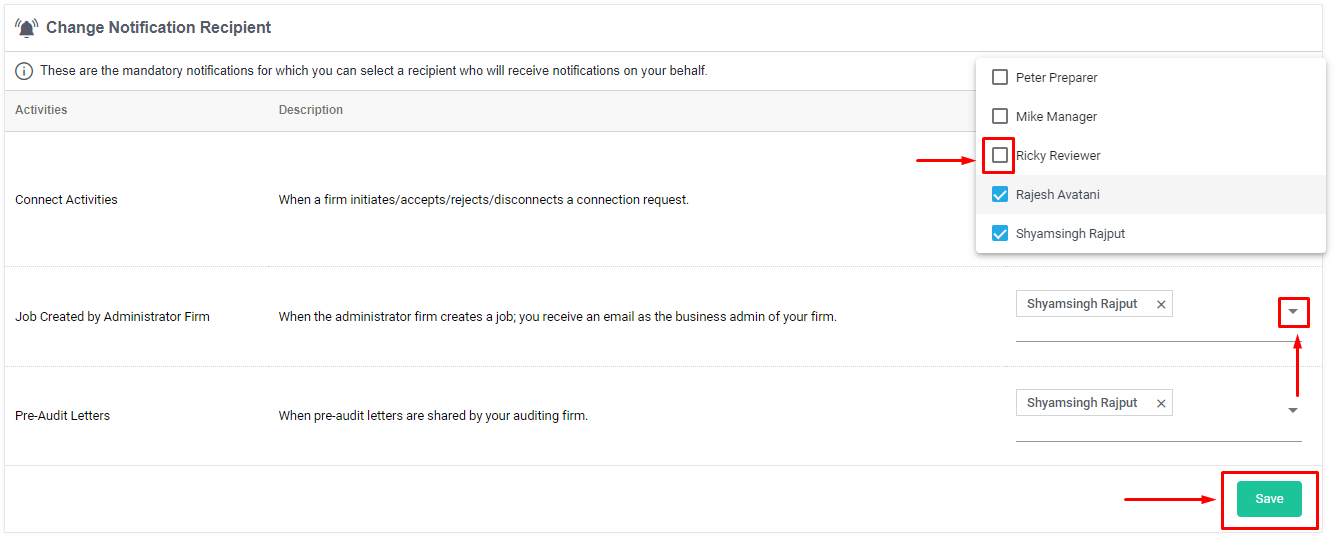
Step 3:- Go to the Change Notification Recipient section which is available below the Manage Notifications section.
Step 4:- Click on the drop-down select the recipient from the appearing list under the Recipient heading and click on the Save button.
Related Articles
Email and Notifications on Sorted Lite
Introduction We've introduced a new feature on Sorted Lite that enables accountants to receive notifications. These notifications provide valuable updates about various activities performed on the platform, ensuring efficient communication and task ...Why am I getting so many email notifications for Queries and Review points?
Problem Every time I send a Query or Review Point, both the sender and recipient get an email. How do I minimise the emails? Resolution Email notifications are not currently configurable. From the Audit side, the auditor can opt to publish queries ...How to verify a business code in SMSF Sorted
Overview From SMSF Sorted release 2.2 (October 2020) firms need to verify the business codes that are linked to ensure that data can be imported correctly. This verification may involve external firms if an SMSF Sorted site is connected to an ...Updating Company Details in Cloudoffis - SMSF Sorted
Change Request Form To update any of the details listed below, please fill out a Change Request Form. 1. Company Name 2. ABN 3. Business admin email address 4. Business name in the accounting software 5. Business code in the accounting software The ...Administrator and Accounting Firm Workflow (Sorted Enterprise)
Introduction Cloudoffis SMSF Sorted offers a seamless integration feature where one accounting firm can connect with another for outsourcing purposes. This enables efficient collaboration between firms using SMSF Sorted Basic and SMSF Sorted ...